
Core parking allows an operating system to completely shut off a core, so that it no longer performs any function, and draws little to no power. But when the cores are needed, only then the operating system can wake up the core and speed step them to work on the load that’s put onto it.
Parked core(s) = Power saving > Performance
Now, what unparking does, is that it modifies a few power management settings so that the operating system will never park cores. Instead of parking these cores, it will step them up and step them down according to the CPU load, and hence, it tends to result in a net increase in system responsiveness (and might also increase FPS in games) at the expense of power consumption (which you don’t have to care about unless you’re an eco-green-ozone-friendly-recycle-ophile, which you probably aren’t if you’re reading this). And so, this means:
Unparked core(s) = Performance > Power-saving
So, let’s get to how you’re going to unpark your CPU cores in order to achieve this increase in performance, shall we?
Method 1: Using the Windows Registry Editor (REGEDIT) [Manual]
Step 1: Check the parking status of your cores
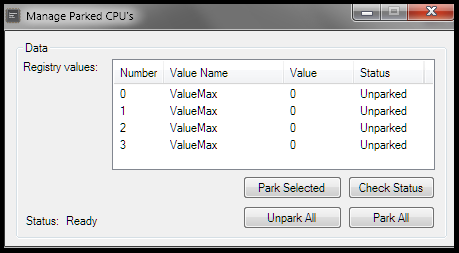
Download the CPU Unparking Tool and extract it. Then run the file “UnparkCPU.exe” and click on the “Check Status” button. It may take some time (anywhere from 5 seconds to 5 minutes, be patient) and then, it’ll show you the parking status of all your cores, like this:

As you can see, all my cores are showing as “Parked” in the status. For you, it may be just 2, or all 4 like me. So now that we know we do have parked cores, let’s get to unparking them.
Step 2: Run REGEDIT
Press the windows key + R, this should bring up the “Run” box. Here, type in “REGEDIT” (without the quotes) and hit the Enter key. You should now have the Windows Registry Editor in front of you, which looks like this:

Step 3: Navigate to the right path
Click on the “Edit” tab and then click on “Find”. Then copy-paste the following text into the search box “0cc5b647-c1df-4637-891a-dec35c318583” (without the quotes). Be sure to check the “Match whole string only” box, and then click “Find Next”. It should look like this:

Step 4: Make the necessary changes to the registry
Now, after it completes the search, the first thing you’ll see is this page:

Here, you need to make changes in only the values of items “ValueMax“ and “ValueMin“.

Double-click on “ValueMax“ and you’ll see a box like this:

Change the value in the “Value data” box to “0” (zero), like this:
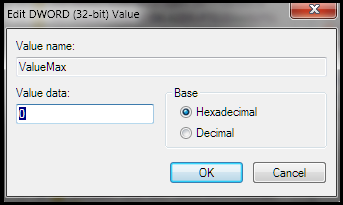
And then click “OK”.
Now, do the same for the “ValueMin“ value, and make it “0” (zero). You’re all set!
Step 5: Reboot your system
No actual description below this subheading, really, I mean I really hope you don’t need detailed instructions on how to reboot your system…
Step 6: Verify if it worked
Run the CPU Unparking Tool again, and hit the “Check Status” button. It should now show you that your cores are unparked, like this:
You did it! All your cores are now unparked!
Method 2: Using a program that does the registry edit for you, quickly and easily [Automatic]
Step 1: Check the parking status of your cores
Download the CPU Unparking Tool (skip the ad to download) and extract it. Then run the file “UnparkCPU.exe” and click on the “Check Status” button. It may take some time (anywhere from 5 seconds to 5 minutes, be patient) and then, it’ll show you the parking status of all your cores, like this:
As you can see, all my cores are showing as “Parked” in the status. For you, it may be just 2, or all 4 like me. So now that we know we do have parked cores, let’s get to unparking them.
Step 2: Unpark
Not much to say here, really, but okay, yeah, just click on the “Unpark All” button, and that should do it… See? Told you, not as much fun.
Step 3: Reboot your system
No actual description below this subheading, really, I mean I really hope you don’t need detailed instructions on how to reboot your system…
Step 4: Verify if it worked
Run the CPU Unparking Tool again, and hit the “Check Status” button. It should now show you that your cores are unparked, like this:
You did it! All your cores are now unparked!

whoah this blog is excellent i love reading your articles. Keep up the great work! You know, a lot of people are looking around for this information, you could aid them greatly.
LikeLike
Excellent stuff. I can not describe how much your blog has helped me in my academic research on the subject. I am now going to get top marks for sure. Thanks a million. I owe you one.
LikeLike
Hey there! if you are still active on this, i have an intel core i5-9600k cpu. it says 6 cores, and 6 logical processors. on the unpark tool it only shows two cores and when i went to msconfig, the number of processors was already unchecked. what else can i do?
LikeLike
Hey!
Have you tried checking the “Number of processors:” option and then manually selecting the maximum number of logical cores (threads) available? After you do this, make sure you reboot and verify that the settings have stuck within MSConfig, and then give the CPU-unparking tool a try.
Do let us know if it works!
LikeLike
Hey man, was just looking through the net looking for some info and came across your post. I am impressed by the info that you have on this blogsite. It shows how well you understand this topic.
LikeLike
Great, thanks for sharing this blog article. Really Great.
LikeLike
well, using an i5-8400 with 6cores and 8threads, only shows 2 on the CPU Parking tool, any advice?
LikeLike
Hey!
Have you tried checking the “Number of processors:” option? You can find it in the following location:
Win+R > “msconfig” > Boot > Advanced options…
Then, if the option is unchecked, check it and manually select the maximum number of logical cores (threads) available. After you do this, make sure you reboot and verify that the settings have stuck within MSConfig, and then give the CPU-unparking tool a try.
Do let us know if it works!
LikeLike
Im happy I found this blog, I couldnt find out any info on this subject matter prior to
LikeLike
Saved as a favorite, I really like your website!
LikeLike
I really like your writing style, fantastic info
LikeLike
Can I copy some of this post, if a put a link back to your blog?
LikeLike
Most definitely, as long as you leave a link to our post!
LikeLike
Valuable info. Fortunate me I found your website accidentally, and I’m stunned why this twist of fate did not took place earlier! I bookmarked it.
LikeLike
Hey friend, is there a difference between cores and logical processors? I’m asking because my processor is i7-4510u and it says I have 2 cores and 4 logical processors, but in Task Manager I see 4 graphs for processors and in msconfig, boot, advanced options, number of processors it lets me select 4.
So, do I have 2 or 4 cores? Is it normal I only see 2 cores with the CPU Parked program?
LikeLike
Hey, Serg!
This means you have 2 PHYSICAL cores, and 2 LOGICAL sub-cores (threads) per one PHYSICAL core.
Hence, a total of 4 LOGICAL sub-cores (threads). So, ultimately, you have 2 cores, and since the unparking tool only sees the cores (not the sub-cores / threads), it is perfectly normal.
LikeLike
adfly is cancer and so are you
LikeLike
Apologies, bud. It sure is pretty scummy, but it generates me a few shillings a month… to spend on yo’ momma.
Just kidding, she’s not worth it.
Meta kidding, genuine apologies, comrade. On a serious note, I had no clue Ad.fly does the scummy “click on Allow to proceed” thing until I tested my own link. They did not do that before.
LikeLike
Is it possible that I see only two cores out of four in the tool?
LikeLike
Hey, Zdeněk! That’s abnormal and unideal. However, could you help me with your CPU model?
LikeLike
Hi. Same problem here! My CPU is i3 9100. I see only 2 cores.
LikeLike
Hey!
Are you 100% sure though that all 4 cores are active during your other operations?
Try this:
Step 1) Windows key + R
Step 2) Type “msconfig” and hit Enter
Step 3) Go to the “Boot” tab
Step 4) Click on “Advanced options…”
Step 5) Uncheck “Number of processors”
Step 6) Reboot
Step 7) Try the core unparking utility again
If it still shows 2 cores, follow the same steps up till step #4 and then this time, check “Number of processors and manually select the maximum value using the drop-down menu (which is “4”) and reboot.
Do let us know if this works!
LikeLike
Hi ! I’m having the same issue. My CPU is an i7-8700.
My option was set as unchecked by default so I checked it and selected 12 on number of processors ( maximum value ). Rebooted and ran the utility tool but it is still showing 2 cores.
LikeLike
Download impossible, only spam. Your site goes now to my blacklist. Beye beye Fakers
LikeLike
Yo, Tom!
This post has been mentioned in quite a lot of forums and communities, and the tool has 7,000+ downloads from my post alone. The only thing is, it routes through ad.fly. Now, come on, it’s not a big deal to wait 5 seconds for a MediaFire download link, is it?
LikeLike
I think we lost him 😦
LikeLike
Hahah, sorry, bud. All these four dollars that I get in a span of two months have corrupted me.
LikeLike
Actually i dont have “ValueMax” and “ValueMin”
LikeLike
It just kept loading after I clicked on ‘check status’ . Can I have solution ?
LikeLike
What’s up, TanWT? Yes, it takes time loading for some people. As the post says, it takes up to literally 5 minutes. Try again!
LikeLike
I could not refrain from commenting. Very well written!
LikeLike
When I open the unparking tool, and select check status, the app closes automatically. Do you have any solutions for this? I have no clue why it’s doing this
LikeLike
What’s up, Breez?! What Windows are you on? Anyway, I’d suggest making sure you are running the tool as an administrator. And if the problem still persists, you should choose the manual method without the tool, using the Registry Editor, which is the other method in the same guide. It’s easy and all the steps are shown. Try it out!
LikeLike
hi!,I really like your writing so a lot! proportion we keep up a correspondence more approximately your article on AOL? I require an expert on this space to resolve my problem. May be that is you! Having a look forward to look you.
LikeLike
We are really thankful towards the author in this post in making this lovely and informative article live here for us. We really appreciate ur effort. Keep up the great work. . . .
LikeLike
I got this web page from my pal who shared with me about
this site and now this time I am browsing this website and
reading very informative articles at this place.
LikeLike
It’s ɑ sһame you don’t һave a donate button! I’d
witһout а doubt donate to this brіlliant bloɡ!
I guess for now і’ll settle foг book-maгking and ɑdding your RSS feed to my Google account.
I looқ forward to new updateѕ and will talk about this blog with my Faceboօk group.
Chat soon!
LikeLike
What up, Convect?! Hahah, there is no literal button named “donate” but there sure is a cool custom designed PayPal button on the right and the bottom of this page. Thank you for the kind words!
LikeLike
howdy, your websites are really good. I appreciate your work
LikeLike
Thank her so much!
LikeLike
Nice post. I find out some thing more challenging on various blogs everyday. It will always be stimulating to study content from other writers and use something from their site. I’d want to use some with the content on my blog whether you do not mind. Natually I’ll provide you with a link on your internet blog. Appreciate your sharing.
LikeLike
Nice 🙂
[[URL redacted AF, keep your spam to yourself]]
LikeLike
Your style is so unique compared to other folks I’ve read stuff from. Many thanks for posting when you’ve got the opportunity,
LikeLike
Nice post. I find out something more difficult on diverse blogs everyday. Most commonly it is stimulating to see. Thank you sharing.
LikeLike
Good
LikeLike
[…] bei der ihr all eure CPU-Kerne aus dem „Ruhemodus“/Standby holt und voll verfügbar macht. Hier findet ihr eine englischsprachige Anleitung. Hinweis: Nach der Anwendung und einem System-Neustart […]
Translation:
[…] where you bring all your CPU cores from “sleep mode” / standby and fully available. Here you will find an English manual. Note: After the application and a system restart […]
LikeLike