
Isn’t thermal throttling a damn pain in the ass?
Isn’t your GPU reaching the ‘demon’s cup of coffee in hell’ temperature bothering you?
Isn’t it about time you dramatically threw your fist in the air, then yelled “I’ve had it!”, and learned the dark art of computer sorcery to banish all your overheating issues to the North Pole?
If your answer to all the above questions is yes, let me introduce you to the best thermal paste you can get your hands on—The Cooler Master Mastergel Maker Nano thermal paste, and this is my real review of it.

Navigation
Why Buy?
What Is a W/mK Value?
What’s In The Box?
Application Technique(s)
My Results
Verdict
Why Buy?
After a hell lot of research and testing, I finally got Cooler Master’s Mastergel Maker thermal paste. The reason I got this thermal paste and not that Arctic Silver MX69 kind of hyped shit is that Mastergel Maker has the highest thermal conductivity among all the other “leading” thermal pastes, while being electrically non-conducting.
Thermal conductivity comparison among the thermal pastes that boast having the “highest performance” (electrically non-conducting pastes only):
Cooler Master Mastergel Maker: 11 W/mK
Arctic Silver MX4: 8.5 W/mK
Noctua NT-H1: 8.9 W/mK
What Is a W/mK Value?
W/mK is Watts per meter-Kelvin. Its value is the comparison of thermal conductivity (rate of heat transfer). As the W/mK value goes higher, the rate of transfer of heat from the 2 surfaces the thermal compound is in between increases.
In short, higher W/mK = Better heat transfer/cooling.
What’s In The Box?

[1] Cooler Master Mastergel Maker Nano thermal paste tube
[2] Grease cleaner to clean the residue of the old paste off of the surface
[3] Instruction sheet
[4] Plastic spatula to spread the new paste or scrape off the old paste
Application Technique(s)
This is perhaps the most important and controversial factor in the effectiveness of a thermal paste. The universally topic that’s damned to be debated forever—Application technique.
Techniques vary from person to person, based on their own experiences and/or understanding and/or opinions. From the “pea” method to the “rice grain” and “X” methods, you’ll come across probably every single geometric shape available when it comes to people talking about application technique.

Now, the technique that worked best for me was applying a nice and generous globular blob of the thermal paste onto my CPU/GPU’s processor die, and then spreading it manually all over the surface with the spatula provided. The key thing here is to not put a layer that’s too thin (don’t be a miser with your paste, there’s a lot more left in there, use a generous amount, this is what you bought it for, didn’t you?), but actually apply a good thick layer because your purpose is to make contact between the heat sink’s surface and the die/IHS’s surface, like shown here:
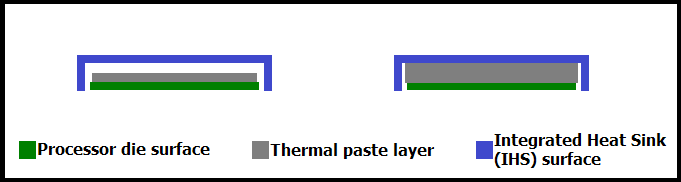
This technique of application makes the most sense, because most of those other methods spread the paste only around the center of the surface, not the corners, and in the methods where the paste is being spread to the corners, it is not in a uniform layer, which impacts the heat transfer significantly as the surface area in contact decreases.
In my method, the paste is applied generously and spread evenly into a thick layer, which ensures that both the surfaces are in perfect contact with each other via the paste itself, without any left out corners or uneven application. Makes sense, right?
NOTE: Again, you bought this paste for the cooling of your CPU/GPU. Why would you want to save it as if it is some limited edition gypsy-tears-enriched magic thermal material? Use it, otherwise you just wasted your money, got no good results, and will end up whining on the Amazon reviews’ page while it was all your fault that you applied it just to save your precious paste for 5 years in the future or to give it to your children on their 8th birthday or something.
My Results
Witness sorcery at its finest. These are my results and my older thermal paste was the default original manufacturer applied paste.
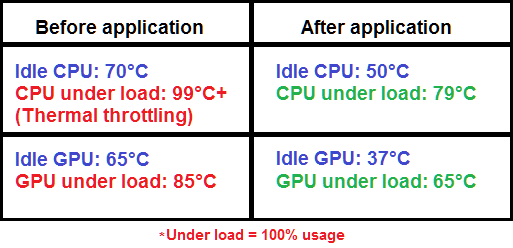
As you can see, the results are absolutely amazing. There is nearly a 30°C decrease in temperature which is insane in terms of just considering you only replaced your old thermal paste with this one. Just… Look at the results, do I need to say any more?
Verdict
This thermal paste is quite literally the best you can get in the electrically non-conducting spectrum. It is definitely worth the price. The volume of the paste in the tube is enough for multiple generous applications (I applied generous AF amounts on all the different small/big GPU heads and the CPU’s processor die and I still have paste left for another application of almost the similar order), and the whopping 11W/m.k thermal conductivity does the best heat transfer from the integrated head spreader (IHS) or the die (in the case of laptop processors, and the “cool de-lid boyz”) to the heat sink or copper pipes that you can find in the range of non-liquid-metal and electrically non-conducting thermal pastes.

Really enjoyed this post.Really thank you! Keep writing.
LikeLike
Best review i have ever seen !
LikeLike
You made some nice points there.
LikeLike
Thanks for sharing the information with us.
LikeLike
Good post.
LikeLike
Thanks for sharing excellent informations. Your website is so cool. I’m impressed by the details that you’ve on this site. It reveals how nicely you perceive this subject. Bookmarked this web page, will come back for extra articles. You, my friend, ROCK! I found simply the info I already searched all over the place and simply could not come across. What a great website.
LikeLike
Appreciate this post. Will try it out.|
LikeLike
Hello! Do you use Twitter? I’d like to follow you if that would be ok. I’m definitely enjoying your blog and look forward to new posts.
LikeLike
Thank you for the good writeup
LikeLike
I have interest in this, thanks.
LikeLike
This is good. Thanks!
LikeLike
great information thank you
LikeLike
Wow, marvelous blog layout! How long have you been blogging for? you make blogging look easy. The overall look of your website is excellent, let alone the content!
LikeLike
just what I was looking for sir
LikeLike
buying this so thank you so much
LikeLike
I like the helpful info you provide in your articles.
LikeLike
Thank you very much!!
LikeLike
Greetings! Very helpful advice within this article! Thanks for sharing!
LikeLike
I’m typically to running a blog and i really admire your content.
LikeLike
Just what I have been looking for, thank you so much
LikeLike
I do accept as true with all of the ideas you have offered for your post. They are very convincing and can certainly work. Thank you for the post.
LikeLike
works
LikeLike
When I initially left a comment I appear to have clicked the -Notify me when new comments are added- checkbox and now whenever a comment is added I receive 4 emails with the exact same comment. Perhaps there is a way you are able to remove me from that service? Thanks!
LikeLike
Hey!
I’m sorry you have to face this issue. In order to unsubscribe from the thread, you can go ahead and open the e-mail which gave you the notification, and then scroll down to the bottom of that same e-mail and you’ll see a little “Unsubscribe” somewhere around the mid-right. Click on that and it shall open a web browser window and unsubscribe you!
LikeLike
Amazing results indeed! Really needed this! thank you!
LikeLike
helped me buy thanks
LikeLike
Only wanna state that this is very helpful, Thanks for taking your time to write this.
LikeLike
some times its a pain in the ass to read what blog owners wrote but this web site is rattling user friendly! .
LikeLike
nice
LikeLike
awesome article
LikeLike
i really needed this
LikeLike
really thanks for this
LikeLike
With thanks! Valuable information!
LikeLike
I gotta favorite this web page it seems extremely helpful extremely helpful
LikeLike
Hi, your post is interesting and i want to share it in my social media account. Keep up the high quality work!
LikeLike
thanks
LikeLike
thank you for sharing this, ur review stands out : D
LikeLike
This is a impressive story. Thanks!
LikeLike
Can’t thank you enough for this post. I needed this. Very well explained and reviewed! I have ordered the same compound and am currently waiting on it but I’ll be following this post’s info for sure!
LikeLike