

Either you want to make your USB stick unusable for one of your friends or a sibling as a prank, or because they get all up in your shit (data), or because you want to render your storage device exactly like you—Useless.
Or let me do you one better. Picture this one. Oh boy, you’re going to want to picture this one.
You buy/order a USB stick, and it was a scam. It said USB 3.0 and had all the “ultra-hyper-mega-giga-lightening fast” specifications listed on the pack. Then, of course, you waited a few days for the package to get home. Upon arrival, you instantly regret your selection after you put the shitty little thing through some practical use—It was a slow piece of shit. Like damn slow. And by that, I mean the “ETA: ∞” in your torrent client kind of slow. Now, since the stick is technically functional, the store won’t take it back. It’s kind of your fault you didn’t research online before buying this particular model. So, now what?
Gotchu’, my dude. Why not make the stick as functional as homeopathic medicine and that one unemployed uncle of yours? They don’t work. Get it? That way, you can go to customer service and tell them their product does not work. And don’t worry, even if they try to format the stick, it still won’t work. The entire thing is reversible, so even if you do not get a refund, you can use this beloved typically rectangular piece of shit of yours forever!
Let me show you, my dude.
Making the USB Stick Unusable
Disclaimer: I will not be held responsible for any trouble you get into or any data you lose. This guide exists solely for ethical and educational purposes.
Step 1: Plug the USB stick in
Take the USB stick which you want to make unusable, and plug it into your computer.
Step 2: Open a command prompt window
Once the USB stick is connected, open a command prompt window by pressing the Windows + R keys and typing “CMD” in the “Run” box. Hit Enter and you’ll have a command prompt window in front of you.
Step 3: Become Hackerman
NOTE: This will erase all the data that you have on your USB stick. What this procedure does is, it deletes the partition of your USB stick that stores all your data. And once you erase that partition, there is no place to store that data, hence it becomes unusable.
In the command prompt window you just opened up, type “diskpart“ and hit Enter. You’ll then see something like this in your window:

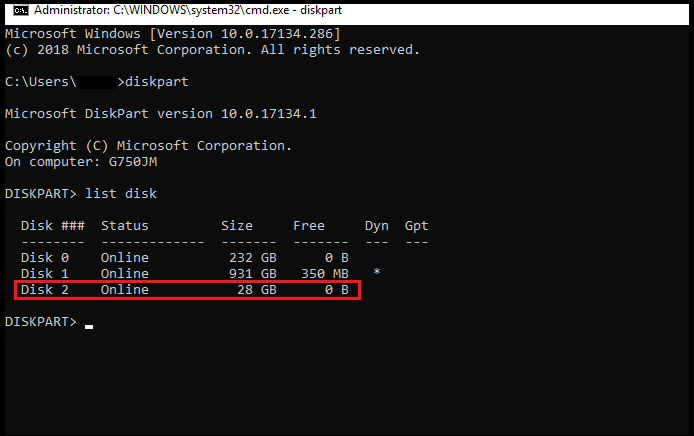
Now, type “list disk“ and hit Enter. This will list all the disks on your system, including your portable USB drive. It should look something like this:

Here, look for your USB stick. You can confirm it by the looking at the “Size” column. In my case, it is “Disk 2”:
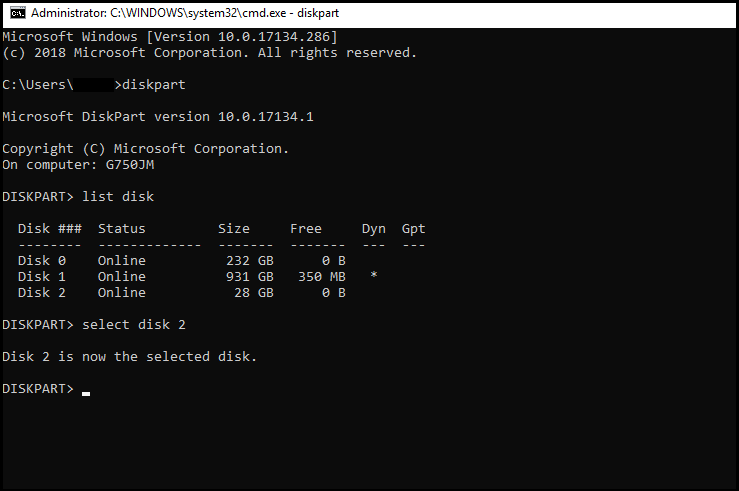
Once you have confirmed your USB stick’s “Disk #”, type “select disk #“—where you need to replace the “#” with the disk number your USB stick is at in the list—and hit Enter. In my case, it is “Disk 2”, so I’ll type “select disk 2”. Once the disk is selected, it should show something like this:
You’re almost done here. All you now have to do is type “clean” and hit Enter, as shown below:

To exit DISKPART, type “exit” and hit Enter. This will exit DISKPART.
Then simply close the command prompt window.
Step 4: Verify
Go to My Computer or This PC to see the USB stick.
It will now show the drive like this, dead:

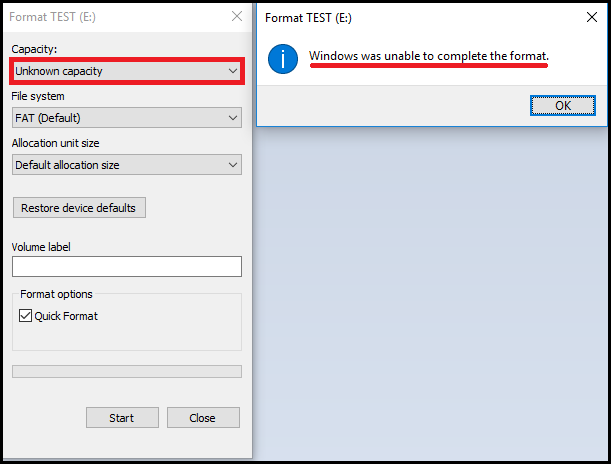
This drive will not be usable. It will not even be format-able anymore. Upon trying to format it, the following will be shown:
You have made the USB stick nonfunctional successfully.
Fixing / Reversing the Effects
Step 1: Plug the USB stick in
Take the USB stick which you want to make usable again, and plug it into your computer.
Step 2: Open a command prompt window
Once the USB stick is connected, open a command prompt window by pressing the Windows + R keys and typing “CMD” in the “Run” box. Hit Enter and you’ll have a command prompt window in front of you.
Step 3: Un-become Hackerman
In the command prompt window you just opened up, type “diskpart“ and hit Enter. You’ll then see something like this in your window:
Now, type “list disk“ and hit Enter. This will list all the disks on your system, including your portable USB drive. It should look something like this:
Here, look for your USB stick. You can confirm it by the looking at the “Size” column. In my case, it is “Disk 2”:
Once you have confirmed your USB stick’s “Disk #”, type “select disk #“—where you need to replace the “#” with the disk number your USB stick is at in the list—and hit Enter. In my case, it is “Disk 2”, so I’ll type “select disk 2”. Once the disk is selected, it should show something like this:
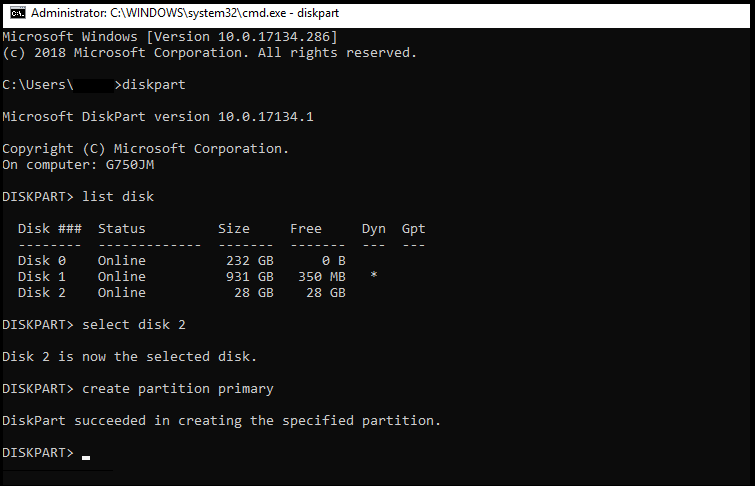
You’re almost done here. All you now have to do is type “create partition primary” and hit Enter, as shown below:
To exit DISKPART, type “exit” and hit Enter. This will exit DISKPART.
Then simply close the command prompt window.
Step 4: Verify & format
Go to My Computer or This PC to see the USB stick.
It will still show the drive like this, still dead:
But, now you can format it to start using it again. And upon trying to format it this time, everything will go just as expected.
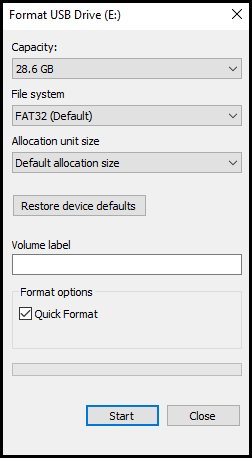
Upon completing the format, the drive will now normally show in My Computer or This PC, as shown below:

There, you’re done. Your USB stick is now functional again.
NOTE: Corrupted data means errors in the computer data that occur during writing, reading, storage, transmission, or processing, which cause unintended changes to the original data. Think of it as having a specific order and number of 1s and 0s and then it is all scrambled all of a sudden. The data then stops making any sense, hence becomes irrelevant and is therefore called “corrupted”. This method is not a way to corrupt data per se, but only erase the virtual partition that stores that data, so it cannot be accessed anymore until a new partition is created. If you truly seek data corruption, either hammer your memory at least 20 times, or break off the data and power pins on your memory, or just call upon the demons of Salazar. They’ll do anything.

Hello I think your blog is very good i found it on google I think will come back again
LikeLike
Mate. I had a problem, and you fixed it. Cheers
LikeLike
Once again, amazing
LikeLike
THANKSS
LikeLike
hi its pst so interesting
LikeLike