
Let’s just assume your “friend” has “stolen” your “homework” and you need to “get it back” from his computer, “with his permission”, of course, but in a fun way. Now, based on this assumption, I’ll show you how to bypass the Windows Login screen without having to worry about the password. All you need is a USB stick, and the best part is you don’t even have to format the stick like in other methods!

Oh, wait, what are guides like this without a disclaimer?
Disclaimer: I will not be responsible for any sort of trouble that you might get yourself into—if you do; and this guide solely exists for ethical and educational purposes.
There, it’s in red and italics too. So let’s begin!
Method 1: Using the installer [Automatic]
Use this method for computers without restrictions on running unknown programs, and accounts which have administrator privileges.
Step 1: Download the tool required
You’re going to need the KonBoot tool for this, which you can download from here.
NOTE: There are newer versions of KonBoot available (v2.4, v2.5, v2.7, etc.), but they will require you to format the USB stick and do not have any significant changes from v1.1, so I recommend using this version itself. Also, the newer versions are ironically way slower in terms of the login screen load time for some reason, so v1.1 is the best in my experience for Windows 7.
After the download is complete, extract the .RAR file anywhere you like and you’ll now have the folder “KonBootv1.1” there.
Step 2: Plug the USB stick in
Take the USB stick which you want to turn into the portable bypass tool, and plug it into your computer.
Step 3: Install the tool onto the USB stick
Now, moving on to the folder “KonBootv1.1” that you had extracted earlier. Open it, you’ll find the following content in it:

Enter the “KONUSB” folder, and you’ll find the following content:
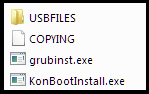
Here, run the “KonBootInstall.exe” executable and it should show you something like this:

As you can see, it enlists all the USB drives connected to your computer, so double-check the drive letter of the USB stick that you just connected, and type the letter, and press Enter. In my case, the USB device was the drive D:, so I put “D” (without the quotations) and pressed Enter, and then this is what you’ll see:
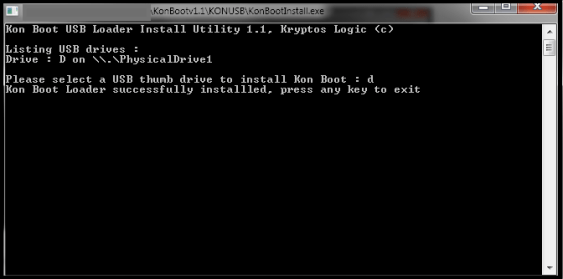
You’re basically done! Press any key and the CMD window will now exit automatically.
Step 4: Test this USB stick on the “friend’s” computer
Shut your “friend’s” computer down, and plug the USB stick into it.
Then turn the computer on, and repeatedly press whatever the key responsible for bringing up the booting menu is (ESC, DEL, F9, F2, F10, CTRL + F12, etc. depending on the manufacturer), and you should get a menu that looks something like this:

Here, you have to select to boot from the USB stick that you have plugged into the computer. So select that specific USB drive and press Enter. A beautiful Kon-Boot logo will generate itself sequentially on your screen, and then a menu will appear. All you have to do is simply press Enter once again. It should now boot up into Windows.
Step 5: Moment of truth – The login screen
Now, you’ll be greeted with the Windows Login screen once again, asking you for the password. But this time, this screen just doesn’t matter. You can enter anything into the password field, and press Enter, and you’ll be logged in. You’ve done it! Now get your “homework” back and shut his computer down after you’re done.
Method 2: Copy-pasting the necessary files [Manual]
Use this method for computers with restrictions on running unknown programs, like school computers with a “Student” account and no administrator privileges.
Step 1: Download the tool required
You’re going to need the KonBoot tool for this, which you can download from here.
There are newer versions of KonBoot available (v2.4, v2.5, v2.7, etc.), but they will require you to format the USB stick and don’t have any significant changes from v1.1, so I recommend using this version itself.
After the download is complete, extract the .RAR file anywhere you like and you’ll now have the folder “KonBootv1.1” there.
Step 2: Plug the USB stick in
Take the USB stick which you want to turn into the portable bypass tool, and plug it into your computer.
Step 3: Copy-paste the necessary files onto the USB stick
Now, moving on to the folder “KonBootv1.1” that you had extracted earlier. Open it, you’ll find the following content in it:
Enter the “KONUSB” folder, and you’ll find the following content:
Enter the “USBFILES” folder, you’ll find the following content:

Now, copy all 3 of these files and paste them in the main directory of your USB stick, that is, not in any folder, directly in the USB stick. You can choose to make them hidden later if you want, but it is essential that you keep it in the USB stick’s root.
You’re basically done!
Step 4: Test this USB stick on the “friend’s” computer
Shut your “friend’s” computer down, and plug the USB stick into it.
Then turn the computer on, and repeatedly press whatever the key responsible for bringing up the booting menu is (ESC, DEL, F9, F2, F10, CTRL + F12, etc. depending on the manufacturer), and you should get a menu that looks something like this:
Here, you have to select to boot from the USB stick that you have plugged into the computer. So select that specific USB drive and press Enter. A beautiful Kon-Boot logo will generate itself sequentially on your screen, and then a menu will appear. All you have to do is simply press Enter once again. It should now boot up into Windows.
Step 5: Moment of truth – The login screen
Now, you’ll be greeted with the Windows Login screen once again, asking you for the password. But this time, this screen just doesn’t matter. You can enter anything into the password field, and press Enter, and you’ll be logged in. You’ve done it! Now get your “homework” back and shut his computer down after you’re done.
Fixing / Reversing the Effects
All that you have done is temporary. So, in order to put the login back to its original state with the previous password, just reboot the computer. This will reverse everything you have done.

A big thank you for your blog.Thanks Again. Awesome.
LikeLike
THANK’S BRO
LikeLike
This site was… how do you say it? Relevant!! Finally I’ve found something that helped me. Cheers!
LikeLike
Thank u for being at the top (nearly) of my Google search ‘usb windows log in bypass’. My hopes of getting logged on to my own fucked up laptop are now realized.
LikeLike
Yo, ‘Stein!
Glad it was convenient. Did you manage to get through the gates?
LikeLike
super, a remarkable idea
LikeLike
I value the blog.Much thanks again.
LikeLike
THIS IS RADDDD
LikeLike
I could not refrain from commenting. Very well written!
LikeLike
Make some more “Hackerman”s, please !!!
New hacks urgent !!!
LikeLike
Hey, Anub!
You can find more “Hackerman” guides on my website itself! Let me help you out with some more of the “Hackerman” stuff I have in here:
Extract usernames & passwords using a USB stick within 10 seconds: https://shurikenskribbles.wordpress.com/2018/01/12/extract-usernames-passwords-in-10-seconds/
Make a keystroke logging USB tool to record keystrokes efficiently: https://shurikenskribbles.wordpress.com/2018/01/22/how-to-keylogger/
LikeLike
bro i love this but is this still working? also, i know u said for win7 but would it work for win10 and load a lil slower or would it not work at all?
LikeLike
I really love your site..
LikeLike
How on Earth??? SICK
LikeLike
Muchos Gracias for your article.Much thanks again. Great.
LikeLike
I wanted to thank you for this fantastic read!! I absolutely loved every little bit of it.
LikeLike
WILD
LikeLike
Very good post. I definitely love this site. Continue the good work!
LikeLike
Undeniably great, Thanks
LikeLike
I truly appreciate this post. Cool.
LikeLike
Really Cool.
LikeLike
grateful thank you
LikeLike
Appreciate you sharing, great
LikeLike
just became alert to your blog through Google, and found that it’s really informative. I?ll be grateful if you continue this in future. Lots of people will be benefited from your writing. Cheers!
LikeLike
Excellent post
LikeLike
Fire my guy
LikeLike
very good
LikeLike
I am so grateful for this post. Thanks
LikeLike
Informative
LikeLike
Major thanks for the post
LikeLike