
Either all your friends have that new omnipotent and—of course—sexy new Windows Terminal and you don’t, or it is more complicated than that and you just reinstalled Windows after having the May 2019 Windows update but chose an older disc image for the installation.
Whatever the reason, Windows Update isn’t automatically updating Windows to the new May 2019 version for you automatically. And you are most definitely missing out on one of the biggest changes Windows has made to itself in literally a decade. Another complete overhaul after the October 2018 update (version 1809), with a new, flexible and very capable Terminal app, and a Sandbox mode to test executions safely, and many more major and minor additions.
Oh, what’s that? You don’t know about the new Terminal? Oh boy. You’re in for a treat, check this out. I have watched this short showcase video at least 20 times by now and once even while putting the link of it here. So, yeah, it’s pretty damn good.
You do not want to read any of this and most of you just scroll directly to the steps anyway. But just in case you are reading all this, here is how to get the May 2019 update manually. I’ve got you, homie.
Reason
The reason you are not being able to update to the new version of Windows using Windows Updates (automatic) is that, with the roll out of the previous huge update (the Dark UI update, also referred to as the ‘1809 update’ or ‘October 2018 update’), Microsoft had realized it had quite a few bugs. Especially impacting the Windows Defender, Search Index, and a few other aspects of Windows. Therefore, Microsoft decided that they will slowly roll out the May 2019 update (also referred to as the ‘1903 update’) as the version becomes compatible with more and more systems gradually after fixing bugs in the update from the reports of the users that actually do get the update automatically. Hence, Microsoft stopped this particular update from automatically installing in many systems.
Now, Windows did stop this update from happening automatically in many systems, but has still officially allowed to manually apply the update yourself as it says here.

So, now that you know the reason, you can move towards finally getting this update done manually.
Step 1: Prepare / Disclaimer
Windows Updates—no matter how minor or substantial—are typically completely safe and reversible, and never affect user data and documents at all. But just in case, always backup all your important data, charge your laptop enough and keep it plugged in (in case you’re on a portable system) and of course, take all responsibility in advance in case you cause any issues to your system.

I hate this part of a disclaimer, but it’s necessary nowadays.
NOTE: If Microsoft has not pushed you the update automatically yet, it could mean that it is not yet ready for your system. So, the installation may get stuck for hours. If this happens, you can easily and completely effortlessly fix/reverse the issue without any damage or loss—read at the bottom of this post, under the “Known Issues” subheading. Also, there’s also a pretty good chance that the manual update would easily work for you. So why not give it a try? You do not lose anything and at least come to know if your system can take the update for now or if you’d have to wait. Anyway, if you’re still ready for this, let’s go!
Step 2: Download the manual Update Assistant
Download the Windows Update Assistant—which will manually download, install and update to the version 1903 (May 2019 update) from official Windows servers—from here. (Size: ~6MBs)
You’ll now have the following application downloaded:
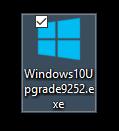
Step 3: Run the Update Assistant
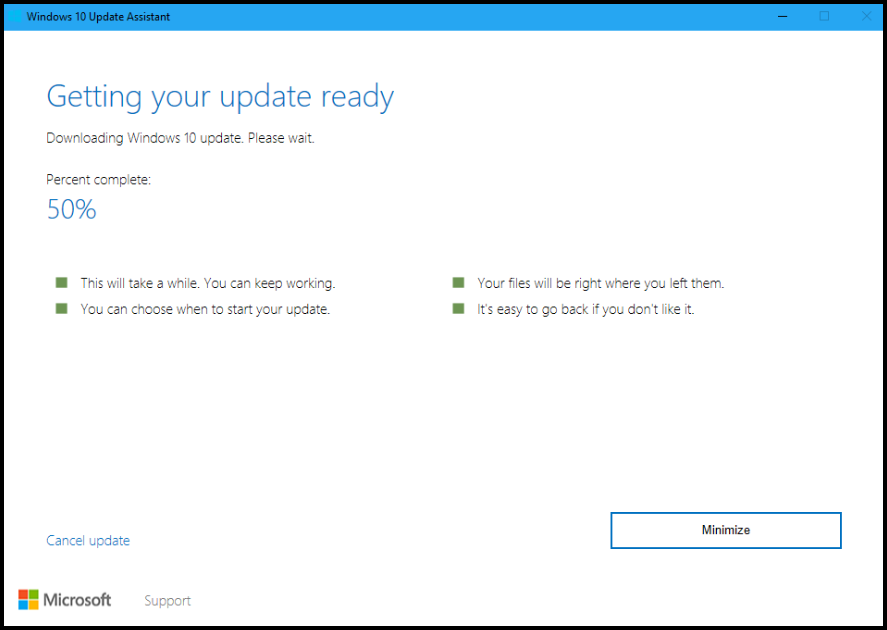
Run the ‘Windows10Upgrade9252.exe’ application, and you will be presented a window that will check for updates:

After the checking completes, you will receive a prompt or few about upgrading to the latest Windows version. Once you’re ready, accept and continue. This process will take time as the entire update will be downloaded first (and it is a huge update, so be patient), and then installed (which may include a few automatic reboots), and then initialized for first use.
Step 4: Done
If everything completes and Windows boots up completely and welcomes you to the first use of your brand new upgrade, you’ve done it.
Give yourself a pat on the back, or summon a demon or something to do it for you. Because you’ve now achieved Darkness.
Known Issues
Issue 1: Stuck at “Working on updates…” for more than 2 hours at the same percentage

If you get stuck at percentages like 82%, 85%, 87%, 92%, 95% and others for more than 2-3 hours, then this is a known Microsoft issue and you need to retry the update process with all USB devices (including keyboards, mice, and storage like thumb drives and card readers) disconnected. Also, after the download completes and the installation phase starts, it’s always a better measure to disable the Wi-Fi driver, or remove the Wi-Fi card altogether, as it has been known to also cause issues with update installations.
After the two dreadful hours or so go by, first make sure that there is no ongoing disk activity (check for the “working” or hard drive read/write light on your system—Yes, you finally found a use for it if you’re not a nerd.
If you’re convinced enough, then go ahead and hold down the power button on your system for 5-6 seconds, till it is forced to turn off completely.
After this, turn it back on and Windows will automatically revert all the changes made (takes 2-4 minutes) and will put you back to exactly where you had left off before trying to update and failed.
Now, ensure that your network card is disabled (for this, you can go to the Device Manager and disable the network card. You can re-enable it once the update completes), and no storage devices are attached to your system, and then retry the update. This will confirm if the update is even ready for you or not. If you still get stuck at a percentage forever after all this, look at the fix in Issue 2.
NOTE: Is a Notepad file popping up on your desktop every time your system boots up? Follow this guide of mine and it will be solved in 5 seconds.
Issue 2: Still stuck at “Working on updates…” for more than 2 hours at the same percentage
If you still get stuck at percentages like 82%, 85%, 87%, 92%, 95% and others for more than 2-3 hours, then you need to abort the update process altogether as it is not meant for your system at the moment.
First, make sure that there is no ongoing disk activity (check for the “working” or hard drive read/write light on your system—Yes, you finally found a use for it if you’re not a nerd.
If you’re convinced enough, then go ahead and hold down the power button on your system for 5-6 seconds, till it is forced to turn off completely.
After this, turn it back on and Windows will automatically revert all the changes made (takes 2-4 minutes) and will put you back to exactly where you had left off before trying to update and failed.
So, overall, it’s a win-win if you did get the update successfully installed. But if not, then don’t worry, it will automatically come to you when your system is ready and the update has—well—updated enough to be fixed. Be sure to keep checking the “Check for Updates” section in Windows’ setings.
NOTE: Is a Notepad file popping up on your desktop every time your system boots up? Follow this guide of mine and it will be solved in 5 seconds.
Issue 3: What needs your attention window + “driver service that isn’t ready for this version…”

If you get the above interruption in your update, just navigate to the “Common Files” directory. Typically, this should be:
C:\Program Files\Common FilesInside this folder, look for the folder named “BattlEye”, and delete it.
Now, try the Update Assistant again. This time, it should go through.
Issue 4: Stuck at the “Downloading Update” phase
If you get stuck at a particular percentage in the download phase of the update for more than 1 hour or so, and are 100% sure it’s not an internet speed issue on your side, then you can reset the download progress and then try again.
To do this, follow these steps:
Download the .bat file I have made that includes all the required Command Prompt commands for stopping the update services, delete the existing download cache, reset the update service policies and security configurations, registering/re-registering .DLL files associated with Windows Updates services in the registry, and then finally restarting the stopped update services—from here.
Extract the downloaded .RAR and run the “Reset.bat” file. If you would like to, you can check all the commands the file involves by right-clicking on the .bat file and selecting “Edit”.
Still got trust issues? All the commands are listed below:
@echo off
net stop wuauserv
net stop msiserver
net stop appidsvc
net stop cryptsvc
net stop bits
del "%ALLUSERSPROFILE%\Application Data\Microsoft\Network\Downloader\*.*"
del %systemroot%\SoftwareDistribution /S /Q
del %systemroot%\system32\catroot2 /S /Q
sc.exe sdset bits D:(A;;CCLCSWRPWPDTLOCRRC;;;SY)(A;;CCDCLCSWRPWPDTLOCRSDRCWDWO;;;BA)(A;;CCLCSWLOCRRC;;;AU)(A;;CCLCSWRPWPDTLOCRRC;;;PU)
sc.exe sdset wuauserv D:(A;;CCLCSWRPWPDTLOCRRC;;;SY)(A;;CCDCLCSWRPWPDTLOCRSDRCWDWO;;;BA)(A;;CCLCSWLOCRRC;;;AU)(A;;CCLCSWRPWPDTLOCRRC;;;PU)
cd /d %windir%\system32
regsvr32.exe /s atl.dll
regsvr32.exe /s urlmon.dll
regsvr32.exe /s mshtml.dll
regsvr32.exe /s shdocvw.dll
regsvr32.exe /s browseui.dll
regsvr32.exe /s jscript.dll
regsvr32.exe /s vbscript.dll
regsvr32.exe /s scrrun.dll
regsvr32.exe /s msxml.dll
regsvr32.exe /s msxml3.dll
regsvr32.exe /s msxml6.dll
regsvr32.exe /s actxprxy.dll
regsvr32.exe /s softpub.dll
regsvr32.exe /s wintrust.dll
regsvr32.exe /s dssenh.dll
regsvr32.exe /s rsaenh.dll
regsvr32.exe /s gpkcsp.dll
regsvr32.exe /s sccbase.dll
regsvr32.exe /s slbcsp.dll
regsvr32.exe /s cryptdlg.dll
regsvr32.exe /s oleaut32.dll
regsvr32.exe /s ole32.dll
regsvr32.exe /s shell32.dll
regsvr32.exe /s initpki.dll
regsvr32.exe /s wuapi.dll
regsvr32.exe /s wuaueng.dll
regsvr32.exe /s wuaueng1.dll
regsvr32.exe /s wucltui.dll
regsvr32.exe /s wups.dll
regsvr32.exe /s wups2.dll
regsvr32.exe /s wuweb.dll
regsvr32.exe /s qmgr.dll
regsvr32.exe /s qmgrprxy.dll
regsvr32.exe /s wucltux.dll
regsvr32.exe /s muweb.dll
regsvr32.exe /s wuwebv.dll
netsh winsock reset
netsh winsock reset proxy
net start bits
net start wuauserv
net start appidsvc
net start cryptsvc
@echo RESET SUCCESSFUL, YOU CAN NOW CLOSE THIS WINDOW, MY DUDE.
pause
Now, after running the .bat file, let it do all the work.
After everything is done, you’ll see the text “RESET SUCCESSFUL, YOU CAN NOW CLOSE THIS WINDOW, MY DUDE.” at the bottom of all the commands executed, as shown below:

This will mark the end of the entire reset process. So, you can now close the window by either pressing any key on the keyboard or clicking on the X button on the Command Prompt window.
You’re done. Try updating Windows once more, and this time your download should go through without any issues.

This really answered my problem, thank you!
LikeLike
Youre so cool! I dont suppose Ive read anything in this way before. So nice to uncover somebody with original thoughts on this subject.
LikeLike
I don’t even know how I ended up here, but I thought this post was good. I don’t know who you are but certainly you are going to a famous blogger if you are not already 😉 Cheers!
LikeLike
WONDERFUL Post.thanks for share..more wait .. …
LikeLike
Thanks for the help! I didn’t know the update assistant existed until now and it helped me get past the version 1809 update wall.
LikeLike